Showing posts with label dessert. Show all posts

March 14, 2009

Puto

One night, I told two of my ex-roommates that I was craving puto really bad. They stood there and stared me with a shocked look. What? I know it's not the healthiest thing to eat, but it's so good. They informed me that puto is a rather unsavory word in the spanish language. Oh? It's funny that such a word is used for a great dessert.

I can't remember the last time I had puto. It's probably been 7 years or so.It's one of my favorite filipino desserts. Puto is a steamed rice cake that can be flavored with a number of ingredients.The addition of ube or pandan gives the puto a different flavor as well as give it color.Even the addition of cheese makes it a very special treat.

The type of container used to make the puto does not matter. They do make special puto cups, but they are not necessary.


Putong Puti

1 cup rice flour
1/3 cup sugar
pinch of salt
1 tsp. baking powder
1 cup coconut milk
1 Tbs. water

Combine the rice flour,sugar,baking powder, and salt. Mix in coconut milk and water until well combined.Fill your desired containers 2/3 full. Steam for 20 minutes or until a toothpick inserted in the middle comes out clean.

February 13, 2009

Take a Mental Vacation!


Barcelona! Tuscany! London!

What do all these place have in common?

Well, they are places that I doubt I will be able to see in my lifetime. You see, there's the whole actually having to pay money to get on the plane rule. What's that about? They're going anyways. I'll give up my snacks. Ooo or better yet, I'll pass out the snacks and drinks. Please?

Yeah, I doubt that would work, so I have to go with the next(next) best thing. Bringing it to my home. The thing that I love about food is that it allows you to enjoy the culture and flavors of a different country without leaving your town or even your home. You can tell a lot about a country by the way they cook and what they cook. I should have just gotten a degree in food history. Is there even such a degree?

...anyways, lets take a mental vacation to Spain. To make this work, we need to appeal to all the senses or at least a few key senses.

  • Sound: Throw on some flamenco and dance around your living room. The internet has so many free music sources that you would be able to find hours of music.
  • Sight: The travel channel always has a show showcasing a certain country or travel story. If you have cable, then you're able to immerse yourself this way or search for it on the internet.I'm sure everyone knows or has heard of Samantha Brown. Btw, if her job is ever open, will someone let me know? I'd like to sign up for that gig.
  • Taste: Oo Oo. This is my favorite sense. (obviously) The food of Spain is so diverse, but always good. They basically have something for everybody. The country is placed in the perfect spot. They have access to so many different bodies of water and borders France (a country also known for it's culinary wonders).
I could go into touch, but I think we're good at this point. Put it all together and you have your mental vacation.

Let's go back to the taste thing. What are my favorite dishes from Spain? I could go with paella or the spanish tortilla, but I like dessert. Crema catalana is one of my favorite dishes to eat. It's much like crème brûlée that you find in France, but this is not baked in the oven. It's a mixture of egg yolks, milk, cornstarch, sugar, orange zest,and lemon zest. The mixture is cooked until slightly thickened, poured into ramekins, and placed into the cooler for a few hours until set. After that, the fun part starts. Just a sprinkle of sugar and a blow torch and you have yourself a delicious dessert.


Crema Catalana

1 cup Sugar
4 egg yolks
2 cups milk
1 tbsp cornstarch
1 cinnamon stick
1 tsp. vanilla extract
zest of 1/2 lemon
zest of 1/2 orange
Sugar, for sprinkling

In a medium bowl, whisk egg yolks and sugar together until creamy and light in color. Whisk in cornstarch, milk, vanilla extract, and zest of the lemon and orange until well blended. Pour the mixture into a medium saucepan and heat slowly over medium heat. Make sure you constantly stir until it is just thickened. Once you are able to coat the back of a spoon, pour into your chosen servings dishes. Place into the refrigerator for at least 2-3 hours, or until set. Sprinkle sugar on top and brown with a blow torch.

February 8, 2009

Valentines 2009

So I was finally tagged by the 25 things fwd going around facebook. Normally, I ignore these requests and people eventually stop tagging me. This time, I decided to do it. Mostly out of boredom. One of my answers was I hate cooking for myself, but love cooking for others. This is especially true around the holidays. I love making different baked goods, wrapping it up all pretty, and sending them to my friends and family. This habit started in high school when I would bring my friends baguettes (made the right way) and birthday cakes. That habit has only gotten stronger through culinary school. I've learned so many different cooking techniques, so of course the quality of the products have risen.

Valentines day is on saturday, so it's time to start sending out treats to those who live more than a few miles away. This year, I decided to stick with shortbread cookies and brownies. A shortbread cookie recipe can be found here. Instead of covering them with fondant, I iced the cookies with royal icing.The first step to making these cookies is to take royal icing that is stiff enough to pipe with and let it dry for an hour.Second step is to use a thinner royal icing for flooding. This can be achieved by simply adding a few drops of water.After flooding, it's best to let it sit for several hours to set.

I let these sit for 2 hours, then decorated them by piping on colored royal icing and painting with gel colors.
I let these set overnight, then packaged them up.


The other treats I have included are heart-shaped brownies that are drizzled with hazelnut chocolate. Half of the brownie is definitely the perfect serving. It's dense,but soft and very...very chocolately.


Cocoa Brownies

10 Tbsp. butter, unsalted
1 1/4 c. granulated sugar
3/4 c. plus 2 Tbsp. unsweetened cocoa powder
1/4 tsp. salt
1/2 tsp. vanilla extract
2 eggs
1/2 c. flour

  1. Preheat oven to 325 degrees F. Butter baking pan of desired size and set aside. For thicker brownies, use a smaller pan.
  2. Place butter,sugar,cocoa powder,and salt in a medium microwaveable container.Place into microwave until butter melts. Throughly mix ingredients together.
  3. Add vanilla extract and eggs. Mix until combined.
  4. Add flour and mix until you cannot see it anymore. Do not overmix.
  5. To the prepared pan, add the batter.
  6. Place in the oven for 25 minutes or until a toothpick inserted into the center comes out slightly moist.
  7. Let it cool completely on a rack and cut into desired shape and size.


December 18, 2008

Peanut Butter Gianduja

Found this box at the local hobby shop.Perfect for chocolates.

I've been putting off this post for a few days now.Finals came up,so I was concerned with that and now I'm at my parent's with a slow connection and can barely upload pictures. Crapola! This is my third and final post on my christmas chocolates this year. I fared quite well for my first time of actually getting something out and look forward to next year. This year's box includes 4 different confections.

1. Matcha Bonbons
2. Gingerbread latte Bonbons
3. Caramel Squares
4. Peanut Butter Squares

Peanut Butter "Gianduja" (seriously my new favorite word)

1 part peanut butter, smooth
1 part white chocolate chips

1. Melt white chocolate in microwave using a microwave safe container.
2. Melt the peanut butter in a microwave safe container as well.
3. Mix the peanut butter and white chocolate together until thoroughly combined.
4. Line a small baking sheet with foil or plastic wrap and pour mixture into sheet.
5. Level it out and put in the freezer to harden. (It's much easier to cut while cold)
6. Take out of foil or plastic wrap and cut into 1 inch sqaures using a heated chef knife.
7. Place back into freezer until ready to dip into melted chocolate.

Happy Holidays!

December 9, 2008

Caramella...Caramello. Christmas gift # 2


"Would anyone like a caramel?", I asked my dinner guests.

"A what?", a guest said.

"Caramel"

"Don't you mean 'Kar-mul'?"

"No, 'kar-a-mel'."

Potato and tomatoes. Everyone has their way of saying things. I quite enjoy my pronunciation of the word,mmk?

Caramel Squares
Adapted from this recipe

2 Cups Heavy Cream

1 can sweetened condensed milk
2 cups light corn syrup
1/2 cup water
2 cups granulated sugar
1/2 cup (1 stick) unsalted butter

1 tablespoon kosher salt

1. Prepare a 10x10 pan by lining it with aluminum foil and spraying the foil with nonstick cooking spray.

2. Combine the cream,condensed milk,and salt in a small saucepan, and place the saucepan on a burner set to the lowest heat setting. You want the milk and cream to be warm, but do not allow it to boil.

3. In a medium-large saucepan combine the corn syrup, water, and granulated sugar over medium-high heat. Stir the candy until the sugar dissolves, then use a wet pastry brush to wash down the sides of the pan to prevent sugar crystals from forming and making the candy grainy.

4. Insert a candy thermometer and reduce the heat to medium. Allow the mixture to come to a boil and cook until the thermometer reads 250 degrees F.

5. Add the softened butter chunks and the warm milk-cream mixture. The temperature should go down about 30 degrees .

6. Continue to cook the caramel, stirring constantly so that the bottom does not scorch. Cook it until the thermometer reads 248 degrees F, and the caramel is a beautiful dark golden brown.

7. Remove the caramel from the heat and immediately pour it into the prepared pan. Do not scrape candy from the bottom of the saucepan. Allow the candy to sit overnight to set up and develop a smooth, silky texture.

8. When you are ready to cut the caramel, place a piece of waxed paper on the counter and lift the caramel from the pan using the foil as handles. Flip the top of the caramel onto the waxed paper and peel the foil layer from the bottom of the caramel.

9. Spray a large knife with nonstick cooking spray. Firmly cut into the caramels, creating 1” squares. Wipe the blade and re-spray as necessary.

10. Wrap the squares in waxed paper. The caramels will gradually spread and lose their square shape if not wrapped soon after cutting. Alternately, you can dip them in chocolate once they are cut.

11. Store the caramels at room temperature for up to two weeks.


December 7, 2008

Matcha!


Wow,It has been awhile since I have posted an entry. I've been cooking plenty,but that's pretty much all I have been doing. Just cooking. I haven't thought about taking pictures or writing about it. I have just been cooking.It's too bad because I've come up with some pretty delicious dishes.

One of the culinary projects that I have been experimenting in is chocolates.I have always wanted to send chocolates or some sort of confection as a holiday greeting to friends and family. I tried last year, but I was too busy to focus on them. This year I did it.

Matcha is a fine powdered green tea.It is most commonly used in japanese tea ceremonies, but is used to flavor foods such as mochi or soba noodles. I was given a bag of it, so I decided to make green tea bonbons.

Matcha has an acquired taste.It does have a bit of a bitter taste,so some people like it and some people don't. Personally, I love green tea. I was very happy with the ganache.

Matcha Ganache

7 ounces White chocolate
1/2 cup heavy cream
1 1/2 teaspoons Matcha Powder

1. Heat heavy cream in a small saucepan over medium-high heat.I usually get it to a boil.
2. Whisk the matcha powder into the heavy cream and immediately pour over the white chocolate.
3. Whisk the chocolate and heavy cream together until the chocolate has fully melted.
4. Enjoy!

Edit:

I received a comment from an anonymous poster asking for more details on how I made these chocolates. These were molded. One day, I will talk about the process in my own words, but here is a video from the Today show that featured Norman Love who used to be the chocolatier for Godiva. In this segment, he goes through the process of molding chocolates. Very informative,imo. The way I achieved this color was to first spray the molds with plain cocoa butter. I let that dry and flicked black cocoa butter into the mold. After letting that dry, I sprayed the mold with a green color. At first, I was going to coat with white chocolate, but I decided that milk chocolate would be really great with the color.

November 4, 2008

Fall Shenanigans


The other morning I had looked out my kitchen window and observed the courtyard. It was pretty early in the morning. Squirrels and turkeys were out doing their thing and you could still see the green grass with a few scattered leaves. I left the kitchen to do whatever I was doing that morning and I came back a couple hours later and looked out the window once again. The ground was covered in leaves. Not just a few more leaves, but covered. I looked up at the trees and they were still pretty full and slightly green. Where did these leaves come from? Where have the seasons gone? I want that season between summer and fall back. The one where it’s still pretty warm, but not too warm. It’s Michigan and I have to put up with it for now. I’m not powerful enough to change the seasons yet. Hopefully, this will be my last winter, so I’ll try to cherish it..or something.

To celebrate the season, I made these cute little Fall leaf cookies.

These cookies are made with a shortbread cookie and fondant. The combination of those two components makes for a very good cookie. The shortbread is not too sweet and has salt in it, so it goes well with the fondant that is mainly sugar. I recommend using a fondant that is actually tasty. I actually don’t remember what brand of fondant I used for this because I forgot to write down the name before I threw away the packaging. I’ll try to remember to next time.

I didn’t take pictures for the process of making these cookies, but one of my absolute favorite sites, Cake Journal , has a great tutorial on covering cookies with fondant.

Shortbread Cookies
Makes about 20 2-inch cookies

1 cup butter (room temperature)
1/2 cup granulated sugar
1 tsp salt
1 1/2 cups all purpose flour

Preheat Oven to 350 Degrees F

1. Cream butter, sugar, and salt together until well combined.
2. Add flour 1/2 cup at a time to butter mixture and combine.If the dough is too
dry, then add ice cold water. If it is too wet, then add more flour.
3. Once the dough has been thoroughly combined,cover with plastic wrap and let it
chill in the fridge for 30 minutes.
4. Take the dough out of the fridge and roll out onto a floured surface. Roll out to
your desired thickness. I like cookies that are 1/4 inch thick. You can attempt
to cut out your cookies now, but I prefer to put the "sheeted" dough back in the
fridge for 15-30 minutes.It's much easier to work with colder shortbread dough.
5. Cut out your desired shapes and bake for 10 minutes.I only bake these cookies to
where it's just barely golden brown around the edges. The recipe calls for no
eggs and you are basically cooking the flour.

*This recipe can be doubled.

November 2, 2008

Chocolate Dreams


I’m starting to really get into chocolates. On the first day of my advanced pastry class, the chef set out all the different types of chocolate he had and told us everything he knew about it. The history of chocolate is quite interesting. Over one of my breaks, I’ll have to pick up a few books at the library on chocolate and read more about it. The last week or so of my class, we focused mainly on chocolate. We covered rolled, dipped, and molded techniques. We also taste tested our creations. (Which prompted my new membership to the local YMCA) I love how chocolate is such an involved process, yet so simple. It’s a creation that takes years to perfect and lots of time and science only to be consumed within seconds. I’ve developed myself to become some sort of a chocolate snob now. If milk chocolate does not taste caramely, then I don’t want it.

I stopped by the local cake supply store to pick up a few molds. Every Christmas, I've wanted to give bon bons away as part of my greeting cards. I was very close to making that happen last year, but several things happened and I was not able to make that happen. Since christmas is right around the corner, it's time for me to start working on them. I'm excited to share the flavors that I can come up with. :)


October 20, 2008

Polvoron : Childhood Callback


Many of my childhood memories involve food of some sort. I guess it’s fitting that I decided to pursue a career in the food industry. Now that I’m older, I find myself thinking about the old dishes I used to eat and more specifically, the candies. Now that white rabbit is slowly making it’s comeback, I find myself craving it so bad. It’ll be awhile until it gets back to the states, so I move to my second favorite candy; polvoron. The only problem is that I live 45 minutes from the nearest Asian market. I suppose I could suck it up and go, but that’s way too much for some candy. So, what’s the next best thing? Making polvoron.

We normally bought the Goldilocks brand. This recipe tastes pretty close to that brand ,but isn’t all pretty like they do it. There are polvoron molds to purchase, but they are not necessary.

Polvoron

4 cups flour

¾ cup powdered milk

1 ½ cups sugar

1 1/3 cups unsalted butter


1. In a nonstick skillet, toast the flour until light brown. (About 8 minutes) Remove and cool.

2. Sift together the flour,powdered milk,and sugar. Mix Well.

3. Add melted butter and mix throughly to form a ball of dough.

4. Pinch off enough dough to form 3/4 inch balls, place onto a cookie sheet and flatten.

5. Let rest for 30 minutes and wrap in waxed paper.

* If the dough is a little dry, then add more butter or water. Just enough to bring it together tho. If too wet, then add more powdered milk. This recipe is very forgiving, so mishaps can be fixed easily.


October 14, 2008

Pumpkin Bread

I need to stay away from the store when it comes to kitchen stuff. I’m not one to go crazy over shoes or clothes, but show me a Sur la table and I’m in heaven. I usually bust out with the” if I had a million dollars” line every time I’m in a kitchen needs store. I love kitchen stuff. The other day when I was in Jo-Ann fabrics, they had a ton of fall themed dishes on sale. Around the corner, they had sets of 4 mini baking dishes for less than 8 bucks. That is seriously a bargain for me. Did I get them? Yes.


I totally have more kitchen equipment and tools than any average college student living on their own should have; Even more than most culinary students. I purchased a moveable glass as well. I thought about using it on a final exam, but we shall see what happens with that.

Moving on…

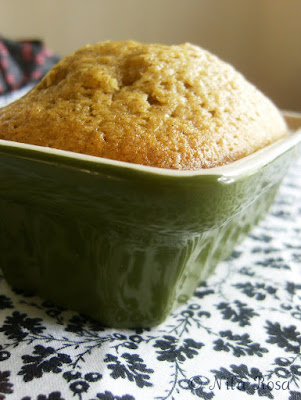
A really good friend of mine, J, sent me a copy of 500 cupcakes by Fergal Connolly. He bought it because I went through a time where all I wanted was cupcakes; lots and lots of cupcakes. I know the cupcake trend is just about over now, but I wanted to try one last recipe. Of course, this is another pumpkin recipe, but I’m sure a lot of people are pumpkined out, but I’m not! (yes, I made up my own word)500 cupcakes had a great sounding recipe for pumpkin muffins, so I decided to try it out. Instead of keeping most of it in cupcake form, I took my new baking dishes out for a test drive. It is against everything good and foodie to not use new kitchen equipment or plates within 48 hours. Coming into the last few hours before time expired, I poured some of the batter into these dishes. For the rest of the batter, I poured them into a mini cupcake tin with the intent of frosting them and bringing them to a party this Thursday. Several minutes later, I ended up making the mini cupcake a little darker than I wanted them to be. (I was vacuuming.) The pumpkin loaves rose quite nicely. I wish I would have put in more batter, so they would fully cover the whole dish. After doing some quality control, I found the loaves to be much better. Again, if I didn’t leave the mini cupcakes too long, then they probably would have been great too. The flavor of the pumpkin is very subtle and you don’t get the straight sweetness that you get with a lot of American desserts.

A-for this recipe.

I’m not sure if I’m allowed to post the recipe, so I’ll see if I can get permission to do so and I will edit this one.

October 2, 2008

Chocolate Overload


All I have to say is that I Love chocolate. LOVE chocolate. It’s pretty bad. This is a coffee- chocolate cake I made in class. Around the edge is ribbon sponge. It has layers of chocolate cake, coffee-chocolate ganache, and chocolate bettercreme®. Mmm chocolate overload. I currently have a stomachache from my consumption of this dessert…or overconsumption I should say. *holds stomach* So worth it.


September 18, 2008

Mango Pudding

When I was in kindergarten, my teacher used to videotape everything going on in the class. When the year was over, she put together this montage for the parents. Considering how much of a backstage person I am now, I was surprised to see that I always tried to be the center of attention. Always doing something to show off to the camera or just standing there smiling. There was one particular scene with us sitting there eating juice and cookies and music was playing around in the background. I was pretty easy to spot. I’m the little kid staring at the cookie in her hand and dancing. Mostly some head bobbing and swaying. Now that I’m an adult, I realize that I still do that; Just not so excessive. Whenever I eat something good, I always hum to myself and sway a little. This happens completely involuntary. I guess I watch myself when I’m in public. (At least I think I do. Oh geez.)

Today I made a mango pudding. It came out so good. I would have taken pictures of the mango pudding, but it didn’t quite make it to being photographed. To feed the masses, mostly made up of my family, I made a vanilla pudding, which is the base for the mango. I was able to snag a picture of that. I miss my dishes at home. I had to dig to find something okay to put the pudding in.


Vanilla pudding

1 cup milk or heavy cream

¼ cup white sugar

1 tsp vanilla extract

3 egg yolks

4 tbs flour

1 tbs butter

1. Pour milk into a saucepan and place over medium heat. You are trying to just heat up the milk right now, so watch your saucepan.

2. In a mixing bowl, add egg yolks and sugar. Combine with a whisk. Add flour and vanilla extract and whisk once again.

3. Once the milk has heated up, pour about ¼ cup worth into bowl of egg mixture and whisk. This is called tempering the eggs. This ensures you won’t end up with scrambled eggs.

4. Add the egg mixture into the saucepan and turn up the heat. Make sure you keep whisking. Once the mixture starts boiling, give it about 8 seconds while whisking.

5. Remove from heat and whisk in butter. If your pudding was cooked for too long and it looks clumpy and almost separated, just add some cold milk and whisk together. The mixture should come together just fine.

6. Pour into a separate bowl and chill.

7. For the mango pudding: Just add in ½ cup or more, depending on taste, mango puree or mango compote after whisking in the butter.

May 22, 2008

Attempt # 1- Macarons

Wow, it's been awhile since my last post. No worries. Back on track. The other day I was looking around online and found that quite a few bloggers wrote about making french macaroons or eating them in restaurants. I have never had them, but they look oh so good. I decided to get back in the kitchen and experiment again. I found two different recipes online. One clearly worked out better than the other. I had decided upon Cherry Macaroons and Pistachio Macaroons. Just a little FYI for everyone,pistachios are a pain in the butt to deshell. Plus with eating them along the way, you have to deshell more and more.

Yummy pistachios chillin on the scale

I followed the recipe and for the most part it came out good. When I piped the mixture onto the paper, it was fine.I waited a few minutes,like the recipe said, before putting them in the oven. What came out was definetly not what I was expecting.

Rejected! They look like lava rocks.

After that disaster, I started on the Cherry Macaroons. This recipe actually worked out quite nicely. They piped out nicely like the pistachio recipe and baked up beautifully.

Beautifully piped-out macaroons

While they were cooling down, I made a Cherry Buttercream for the filling. Just the basic buttercream recipe of butter and sugar. I added some of the cherry flavoring and red food coloring. I sandwiched them together and enjoyed.


Finished product. Nom Nom.

Here is the recipe I used for the cherry macaroons:

Cherry Macaroons

Supposedly makes 40-54 cookies. I got about 20.

1 ¼ Cups Confectioners' Sugar

1 ¼ Cups Almond Flour

3 large Egg Whites

1/8 tsp Salt

¼ Cup Granulated Sugar

2 tsp Cherry Flavoring

2-4 drops Red food coloring

Basic Buttercream recipe with cherry flavoring added

Preheat oven to 300 degrees F.

1. Sift confectioners' sugar into a medium bowl. Blend in almond flour.

2. In a large bowl, mix egg whites at high speed until foamy, add salt. Slowly add sugar, blend until soft peaks form.

3. Add vanilla extract and food coloring; take care not to over mix.

4. Gently fold the almond flour mixture into egg whites to incorporate, take care not to over mix.

5. Gently fill a pastry bag (no tip required) with mixture and pipe into 1 - 1 1/2 inch rounds onto baking sheets lined with parchment paper.

6. Bake until bottoms of cookies are just set and tops are firm, approx. 20 mins.

7. Remove from oven and allow to cool on parchment sheets.

8. When completely cool, spread a decent amount of cherry buttercream filling on the flat bottom of a cookie. Sandwich with a second cookie and repeat with remaining cookies.


LinkWithin

Blog Widget by LinkWithin